


WooCommerce Plugin
Instructions for starting the Payment Gateway
![]()
1. Make sure you have activated Besteron service - without activated account and services it is not possible to test payments
2. Download the current Plugin 1.4.5 (Support: WooCommerce version 5 and above)
3. In case you have already used one of the older versions of the Besteron WooCommerce plugin, we recommend in the first step to uninstall the old version and delete all files from FTP that belong to it
4. Install the plugin in your eshop
5. Go to WooCommerce - payment method settings
6. Enable online payment - Besteron payment gateway with redirection and go to plugin settings
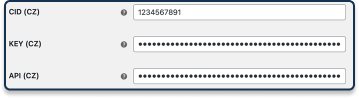
7. Log in to the Besteron client interface → account.besteron.com → Integration and copy the CID data, payment key and API key

8. Enter CID, Payment Key (KEY), API Key
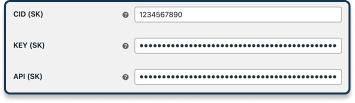
9. krok If you also have a CZ account with a Czech bank account in Besteron, enter the integration data in CZ
Setting up payment methods
→ Check the checkbox according to which services you have activated in the contract,
→ If you have both card payment (including Apple Pay, Google Pay) and online bank transfers activated, the settings will look like this:

→ To cancel the display of one of the payment methods, leave the corresponding box empty
→ Allowed banks - this setting is used to select bank buttons, if you are interested in not displaying any of the supported ones in the payment gateway, select only the ones you want to display (currently supported banks can always be found on the Besteron website or in the Besteron integration documentation)
Payment gateway display options

You have a choice of two ways to display the payment gateway on your page:
1. Simple display - only the Besteron payment gateway will be displayed, redirecting the customer to their secure page, where they can choose the payment method that suits them
Tip: We recommend choosing this option because if the payment fails the first time, the payment gateway can return to choose another payment method. If you choose to display the payment options separately, only one selected payment method will always be displayed during the payment repetition.

An example of a simple display
2. Card payment & Online bank transfers separately – all payment methods are displayed as a separate button and when clicked, the customer is redirected to the selected payment method. In the case of banks, with this setting, the customer will be redirected directly to the bank's page, from which it is no longer possible to return to the withdrawal.

Setting the payment identifier in the payment gateway
The order number is your identifier in Besteron, under which you can find the payment in the client interface, and also in the statements you receive from Besteron for paid payments. By default, the order ID will be sent from WooCommerce as the order number. In case you have any plugin for custom order numbering / renumbering, check the setting for the payment identifier.

Setting the validity period - validation time
It determines until when the payment can be made by the customer. By default, it is set to 1 hour - 3600 seconds. For a standard e-shop, we recommend leaving this setting. If you need a shorter or longer time, you can change it. The time is given in seconds, the maximum we recommend is 3 days (259,200 s.) After this time, it is no longer possible to pay the payment, the payment is automatically marked with the status Time limit has expired.

Updated 2/6/2025.